My Poor Retinas Postmortem

Recently our Studio 1 students have been working on their first project ‘Wherefore Art Thou’. The project set them the challenge of reimagining the game Berzerk in the style of a particular artist. I decided to join in the project as well and was assigned the artist Bridget Riley. This combination resulted in My Poor Retinas (both the name of the game and a lament for what developing the game did to my eyes).
Coming up with a concept
The initial challenge was to work out what the game was going to be. My two touchstones were Berzerk and Bridget Riley’s art pieces. Let’s take a look at the art pieces first.

Movement in Squares, Bridget Riley, 1961
Bridget Riley has been one of the major contributors to the area of ‘op art’ (optical illusion based artworks). The comment elements of her work include regular geometric patterns (typically black and white) that are then distorted. Throughout many of her pieces they convey this sense of reality itself being distorted and twisted. They are uncomfortable to look at because of what they do to our eyes but that discomfort also helps, for me at least, create that appeal. The two key elements I wanted to incorporate from Bridget Riley’s work were:
- Sense of reality itself being distorted
- The starkness of a regular geometric pattern of black and white objects
Let’s now take a look at our second touchstone, Berzerk.

Berzerk, Stern Electronics, 1980
In Berzerk the player is trapped in a maze of rooms. Within each room there are multiple robots. The robots have different capabilities. Some can attack and others can move. The player can flee the room at any point and does not need to kill the robots. The player will gain points for killing each robot and for killing all of the robots. As the player’s score increases the difficulty of the robots increases and is signaled with a change in their colour.
If the player takes too long in any room then the character Evil Otto spawns. Evil Otto cannot be killed and will slowly move towards the player. Evil Otto can also move through walls. If they hit the player then the player is killed. The player will die from a single shot from any robot or from running into a wall. The robots can also kill each other from friendly fire or can die from running into a wall or Evil Otto.
I wanted to keep a lot of the elements from the original game, in particular:
- Enemies that increase in capabilities (and as a result difficulty) based on the player’s score
- The dangerous nature of walls
- The neverending maze environment
- Evil Otto as a means to put the player under time pressure
Combining Berzerk with Bridget Riley’s Artwork
The result of combining these elements was the following plan of attack:
- The environment would be a black and white checkerboard
- Walls would be represented as a distortion (a pinching?) of the environment
- Enemies, the player and Evil Otto would not be visible in the conventional sense. Instead they would distort the environment under them.
- The environment would be procedurally generated
- The mechanics/behaviour of enemies from Berzerk would be preserved
This plan of attack was reasonable given the timeframe (3 weeks) but would also stretch me. The key challenges that I’ll examine more closely were:
- Procedural generation of the maze
- Creating the distortion effect for player and enemies
Procedural Generation of the Maze
I wanted to try and reproduce the same style of maze as the original Berzerk. That meant I would need to know how the original worked. Thankfully, two of my colleagues were also participating and one of them had found the details of how the original game handled it’s procedural generation. I won’t repeat the details here and instead will link to this description on how it works.
I followed the same process outlined to work out where my walls would be. But how to achieve the actual distortion of the environment? For that I used the Unity Terrain system. I created a terrain and applied the checkerboard texture to it. I then procedurally generated the heightmap based on where the walls were. The general process for this was:
- For each point in the heightmap determine if it was near enough a wall to be effected
- If it was near enough work out how close it was. The closer it was to the centreline of the wall the greater the effect to apply.
- The ‘influence’ of all pillars on the point were calculated as a number between 0 (no influence) and 1 (full influence). That number was then used to set the height map value.
A similar process was used to make the height drop off at the edges of the map as well as to have the entry/exit points clearly marked. I’ve also described the process in the video here.
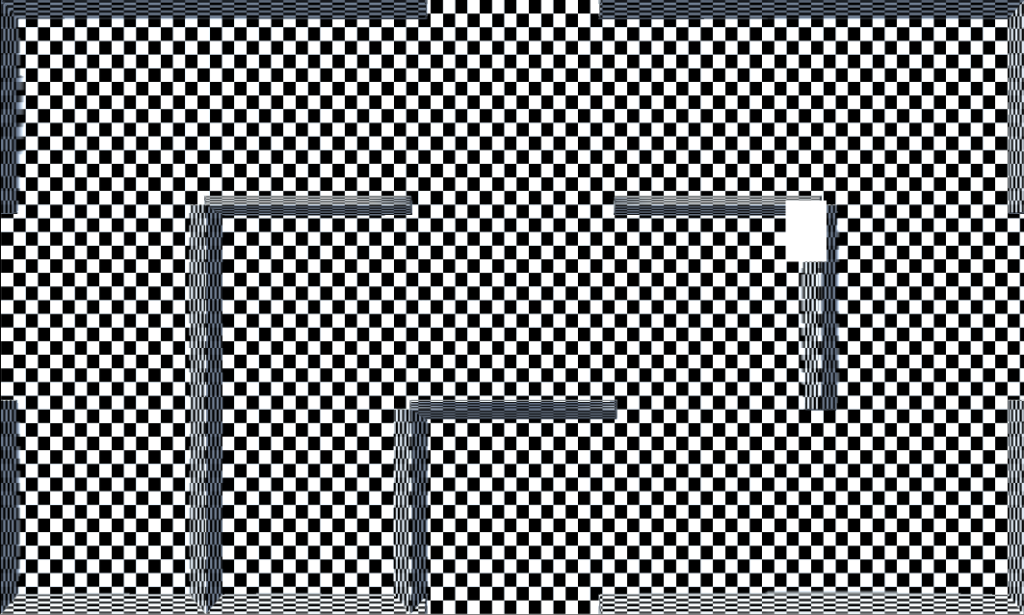
This process worked and it did generate the required terrain shape … but there was a problem … the default terrain texturing 🙁 In Unity the terrain system generates texture coordinates using the X and Z coordinates. It does not incorporate the normal. As a result when I looked top down on the game it was not possible to see any change. It looked like the picture below:

As you can see the distortion is not visible. I needed to use an alternate solution that took into account the slope of the terrain when generating the texture coordinates. The solution was to use a system known as Triplanar Shading. Shaders are an area I am very weak at so I made a choice to grab an asset (Terrain UV-Free Triplanar Texturing) rather than create my own. The result was this:
The distortion in the environment is clearly visible now. Dodging writing a shader just because I’m not good at them was a poor choice however. I’m not going to get better at them by never using them and I should know more about them. On the next project I’ll specifically identify opportunities to work more directly with shaders.
Creating the Distortion Effect
The distortion effect was another opportunity to make use of shaders that I didn’t take advantage of. Before I talk about how I did create the effect let’s talk about how I should have done it. What I should have done is:
- Capture the environment to a texture
- Create a shader that uses the texture and the location of the player/enemies and renders the object by distorting that texture
That would have involved a single shader (perhaps two including Evil Otto) and would have required only a single render to texture. This approach would have had good performance and allowed for the distortions to be very tightly integrated with the terrain. It also would have been a good opportunity to learn more about shaders. I didn’t take advantage of this. I’m not particularly experienced with shaders and don’t enjoy working on them. That’s a rubbish reason for not learning more about an area of technology that is both powerful and useful. To reiterate my earlier point, I need to learn more on them.
So how did I solve the problem? My solution (outlined in more detail here) was to have the player, every enemy and Evil Otto each have their own camera. That camera looked down at the environment and captured it to a texture. Image Effects on the camera applied the appropriate distortion and that texture was then drawn on a quad that could only be seen by the main game camera.
This process worked but it had a number of issues:
- The distortion did not always merge seamlessly with the environment. In particular for Evil Otto.
- The camera for each entity had to be precisely positioned to match the scale
- The performance was terrible on low end devices due to the number of extra renders required.
The solution? STOP AVOIDING WRITING SHADERS 🙂
Concluding Thoughts
Overall, I’m really happy with My Poor Retinas. It came together well and there were no major pitfalls during the development. I’m really happy with the system for the maze generation and how the enemies behave. I am unhappy with the extent to which I avoided writing shaders. My big takeaway from this project is next time there is an opportunity to write shaders then write them. I don’t need to love them, I don’t need to be great at them, but they’re too useful for me not to learn how to be better at them.